Showing posts with label better the next day. Show all posts

Thursday, April 14, 2011

adventurous: beef picadillo

Picadillo in its first stages

Picadillo after cooking down for 2 hours!
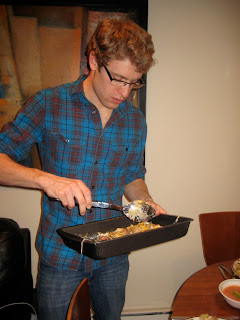
Beef picadillo over quinoa with some pico di gallo on the side

I made a bad choice the other day of going to get groceries on an empty stomach. MISTAKE MISTAKE. anyway, I went to a store in Evanston (I won't name names since I'm not here to promote any grocery retailers) and saw that a certain pasture raised grass fed ground beef was on sale. I DO NOT BUY GROUND BEEF. I think the last time I even contemplated it was when I was 17 and curious about burgers....and as you know I have a thing for ground turkey. I guess the hunger overtook me and I bought 1 1/2 pounds of it. As I checked out, looking at all my impulse buys, I asked myself WHY.

Anyway, I got home, devoured some sushi and tuna salad and looked at my package of ground beef. I kinda regretted it but then thought about all the wonderful things that do indeed taste better once beef is involved. Obviously, I thought about beef picadillo! So, I've had it as a ground beef taco filling type meat before and I remember enjoying it, so I decided to explore recipe options. I modified a Williams-Sonoma recipe and here is the result. It was sweeter and more acidic than I expected, but still yummy. I have given you the modifications to avoid this sweetness and acidity!

Beef Picadillo

1 Tbs. olive oil
2 yellow onion, chopped
1 ½ lb. lean ground beef chuck
4 garlic cloves, finely chopped
2 bay leaves
½ tspn cumin
1 ½ tspn. chili powder
¾ teaspoon ground cinnamon
½ teaspoon ground allspice
1 can (28 oz.) diced tomatoes with juices
1 ¾ cups stock
¼ cup raisins or currants
2 tablespoons tomato paste
3 tablespoons red wine vinegar
Salt and freshly ground pepper, to taste
Suggested side: Quinoa or yellow saffron rice


1. heat olive oil over medium high heat in a deep pan (deep enough to hold all the meat and tomatoes- you'll be doing this all in one pan/pot) and add onions. Cook for 3-4 minutes and then add meat, garlic, and bay leaves. Cook until meat has browned. Pour off excess fat, if any.
2. Add in cumin, chili powder, cinnamon, and allspice next. Cook for one minute.
3. Stir in tomatoes, stock, raisins, tomato paste, and vinegar.
4. Allow to cook down for about 1.5 hours, or until most of the liquid has evaporated and you are left with a thick "sauce." Now, add salt and pepper to taste.
5. Serve over quinoa with a little pico di gallo. This is how I did it and it's lovely!


Exotic beef eating adventures are fun, try it if you eat meat.

yay
HK

Wednesday, March 30, 2011

crowd pleaser: potato and squash gratin


This gratin was a real crowd pleaser. Chris found the recipe for potato, squash and goat cheese gratin from kitchn. I modified it only a tad- here goes!

Potato and Squash Gratin
6-8 red potatoes, depending on how big they are, to get a 50/50 ratio to squash
2 yellow squash
4 ounces goat cheese
1/4- 1/2 cup whole milk
salt and pepper
olive oil
parmesan cheese or breadcrumbs for top

1. wash and dry the potatoes and squash. slice them using a mandoline. aim for 50/50 ratio.
2. put mixture in large mixing bowl, and toss around with olive oil, and salt and pepper to taste
3. layer this mixture on the bottom of the casserole or baking pan you hope you use. aim for a thin layer about two slices thick. put dots of goat cheese throughout. repeat and end with a layer of the squash and potato.
4. this can be made up to a night in advance, so when you are ready to bake preheat the oven to 400 degree. pour up to 1/2 cup of whole milk over the top, depending how deep your dish is: you should have enough milk to almost cover the layers. sprinkle the breadcrumbs or cheese (or a mixture of the two) on top in a thin but substantial layer. cover with foil and bake for 30 minutes. remove foil and bake till top is crusty and brown!
5. let cool for a bit then serve. SUCH A GOOD LEFTOVER

enjoy this. I even used goat cheese, and for those of you who don't know I hardly EVER eat cheese fancier than mozzarella!
Chris serving up the gratin!


Sunday, February 6, 2011

Helen's attempt at Thai Green Curry


Hello!

There are just times when I crave Thai green curry. This craving struck me last week when I happened to have thai green curry paste and some Asian ingredients in the fridge. I proceeded to go for it and make a lovely curry. So, the curry paste I found was pretty legit. Like spicier than I thought and a little went a very long way. So, when you carry on with green curry adventures of your own, please start with a little of the green stuff and work your way up...since you probs don't want to burn a hole in your face!

Helen's Attempt at Thai Green Curry
1/2-1 tablespoon of Thai green curry paste. I got it from an Asian market, it has a Thai label so sorry I can't help with letting you know a brand...but isn't it a good sign that there's no English on it?
smidge of oil, maybe a teaspoon
1 can of coconut milk (I used low fat because I don't like my green curry to taste like slightly spicy coconut fat, but if this is your thing go for the regular full fat version)
1/4 - 1/2 cup chicken stock (could be optional, read below)

my curry add in's
2 Japanese eggplants (partially peeled, sliced on a bias and then into finger sized strips, and lightly sauteed in vegetable oil till slightly browned)
Firm, crispy skinned tofu (you can find this in Asian markets. Make thin slices. If you want it extra crispy, go ahead and saute this in some veg oil too, until brown and even more crispy!)
1 can of baby corn (rinsed, drained, and I go ahead and blanch them to get rid of the "tin" taste)
1/2 a pepper, 1/2 an onion, 2 cups of mushrooms (cook this together in some sort of fat. butter, oil, your choice, till its nice and brown and the mushrooms have lost a good amount of liquid)
1/3 cup of peas/carrots (this is straight up American of me, I won't even pretend. I had it on hand. don't use it if you hate peas or carrots or both
handful or two of thai basil leaves, depending on how obscene you want the basil flavor to be
depending on if this is the vegetarian meal or not...and depending on if I have leftovers to use, I add in some precooked chicken bits. yum.

make it work:
1. Fry the curry paste in the oil for literally 30 seconds or so, and then add the coconut milk. Stir to incorporate the curry into the coconut milk. This will be your yumtastic curry sauce. Let this simmer in the corner if you need to prepare the other stuff, like cook the eggplant or crisp the tofu. Make sure you taste your mixture. Too much curry? too intense? too much coconut? add the stock! not spicy enough? add more paste GRADUALLY. And keep in mind, this is going to cook down so flavors do concentrate....
2.  Dump in the add-ins. Is there an order? Well, think about what you want to soak up the most curry flavor and what you don't want to be a soggy, gross mush. For real, this can happen. I usually put the tofu in first, let it simmer for 3 minutes, then dump all the rest of the stuff.
3. Let this mish mash of curry stuff simmer for another 5-10 minutes on low, until the little bits have soaked up just the right amount of curry (which is obvi based on preference)
4.  I can imagine eating this by itself, but I like rice, so I serve it over rice. yumsville.


HK

Tuesday, January 11, 2011

vegetarian in nature: pesto pasta salad


I started this new year by making a promise to not eat obscene amounts of beef (like I do when I go back home and the first meal I request is braised beef shins, but I digress). When I'm here in etown I try to only eat turkey or chicken if I'm going to have meat at all, but I decided to one up myself! Now, I have 2 vegetarian meals a day. So far, so good.

This is my first attempt at a strictly vegetarian meal. It's loaded up on veggies so I'm not tempted to chop up kielbasa or some other cured sausage product and throw it in there, so yes: the vegetable to pasta ratio is like 50:50.

Pesto Pasta Salad
1 1/2 cup fusilli (I went badass and did regular pasta, not whole grain, but I've done the whole grain before and it works the same)
3 tablespoons pesto*
1 tablespoon oil (whatever you like to cook with)
4 cloves garlic, chopped
1 1/2 cup vegetable medley of your choice (I did peas, carrots, and sweet corn)
1 cup sliced mushrooms (I used button but baby bellas would be nice)
1/4 roasted red pepper, diced
*I usually don't do the premade thing but sometimes its just more practical for my collegiate cooking to get things like premade pesto. If you want to make your own, please do! Alas I did not but the end product was still tasty.

Do it:
1. Boil a big ole daddy pot of water for the fusilli. That should be the first thing you do when you make pasta, before you even touch or wash any accoutrement for it. Maximize your utility minimize stove time. Is that my slogan now?
Use your peripheral vision and check to see when water boils. Salt the water liberally and add the fusilli. Cook according to directions on box.
2. While you wait for the water to boil get the vegetable medley ready. For example, if it is frozen, rinse and let drain.
3. Heat up a saute pan with the oil on medium heat. Maybe it's a wives' tale but I don't like to heat up my nonstick with nothing in it; I put the oil in first then that pan on the stove. When the oil is way hot, add the garlic. Let it get brown, obvi don't let it burn but let it get as close as your cooking anxieties allow. This is when you add the vegetables. Saute them around and add salt to taste if you like salt on your food (seriously, some people don't do salt). Transfer vegetables to a vessel of your choice.
4. In this same pan: take a look. Is there residual oil? If so, throw the pan back on the stove and put the mushrooms in! If not, add a few drops of oil, then put the pan on the stove and add shrooms. I like my mushrooms browned, so leave them in until this happens (on medium heat about 3-4 minutes). Once again, salt if desired.
5. If your timing is awesome, your pasta will be ready just about now. Whenever its ready: drain it.
6. In the minute it takes for pasta to drain, get your mixing bowl out. Spread the pesto around the inside of the bowl. Why? Because its easier to incorporate the thin layer of pesto into the pasta as opposed to a 3 tablespoon sized glob. Let's level here, its like putting the dressing at the bottom of the bowl pre-toss.
7. Toss in the HOT pasta (really, it needs to be as hot as possible for it to absorb the pesto goodness) till its nicely coated in the green stuff. Now add the vegetable medley, mushrooms, and roasted red pepper. If you hate the taste of pepper, leave it out. There is only a 1/4 of it for a reason.
8. Enjoy! Can be served hot or cold! Wow!
Suggestions: I eat this on a bed of kale when I'm feeling extra veg-head. If you are patient, it is one of those dishes (like curry) that tastes better the next day- perfect for packing a lunch or making one cooking sesh span multiple meals.

Comer!
HK